Friday, July 7, 2017

Toddler Travel Trays

My latest endeavor: figuring out how we're going to keep two toddlers busy on a 17-hour road trip.  The Mobile Dollhouse and Rural Car Track are my original ideas.  The uses for the cookie sheets as magnetic trays were Pinterest finds.  Is it ambitious to hope these keep the kids occupied for longer than it took me to make them?

Mobile Dollhouse:


Rural Car Track:


Magnetic Puzzles:


Pattern Block Pictures:


CONSTRUCTION NOTES:

I found the wooden trays at a yard sale.  They were serving trays that display needlework.  I removed the glass and mat board and replaced them with a thick piece of cardboard.


For the dollhouse, I bought a random lot of used dollhouse furniture on eBay.  The kids helped me give it a good scrubbing, and I picked out the best pieces to be used for the project.


The animals for the car track were from the dollar store.  The trees were cupcake toppers I found on Amazon.  


I painted the cardboard using acrylic craft paints, with a matte finish clear topcoat.


After the cardboard sheets had dried, I slid them into the trays and glued all of the pieces on using hot glue.  I bought a few new Hot Wheels for the car track, and a Lego family for the dollhouse.

All I did for the magnetic puzzles was stick little magnets to the back of each puzzle piece.

For the pattern block pictures activity, I found printables online that were the same dimension shapes as the magnetic blocks I found on Amazon.


x

Thursday, January 29, 2015

Song Sticks

Origin of the project:

Each time we put our daughter down to sleep, we read a book or two and sing a few songs.  I was sure that I knew A LOT of songs, but I found myself thinking of the same few every time.  The brain was not cutting it, and I wanted some way to have all of the songs that I knew at my fingertips when it came time to choose.  I found a lot of ideas on Pinterest for having kids choose their chores or choose an idea of something to do when they're bored.  My favorite idea, that could be adapted to create a solution to my problem, was a jar of Popsicle sticks.

Final Product:


My Process:

First, I made an alphabetical list of songs that I wanted to include.  I came up with 150 (I was right, I did know a lot!).  The songs were mostly folk songs and silly songs that I knew from my childhood or had come across in my teaching, that I wanted to pass on to my children.

Next I got out my trusty DYMO label-maker, and ran to Wal-Mart to buy a box of jumbo craft sticks, several rolls of clear label-maker tape, and a plastic container with a lid that could hold 150 jumbo craft sticks.  I spent a few shows worth of time printing out all the labels, each with one of my song titles, and sticking them onto the craft sticks.

The last step was painting one end of each stick.  I wanted to make sure we would sing through all of the songs before repeating, giving her equal exposure to all of them (here's the part where you realize the reason for the "Type-A" title of my blog).  I painted one end of each stick using two coats of acrylic craft paint.  Now when we sing the songs, we pick the ones with the purple ends up, and put them back in the jar purple end down.  Once all of the sticks are purple end down, we turn them all over and start again!

I may decide to get some kind of Mod Podge to paint over the sticks so that the labels stay on longer and the sticks stay nicer longer.  I also plan on creating a book of lyrics and notation for all of the songs so that anyone that sings to her can pick sticks with her and be able to sing any of the songs.

Happy singing!

Thursday, November 20, 2014

Back in the Blogging Saddle

well, it's been over two years since my last post.  so goes blogging i suppose.  in march of this year i gave birth to a beautiful little girl, who is now almost nine months old!  my full time job has shifted from elementary music teacher to mom for the time being, and i couldn't be happier!

Friday, August 31, 2012

Xylophone Stand Update

This is an update on my 4/19/2012 post on the xylophone stands.  I was able to complete the additional eight stands over summer vacation.  Total cost was $233.27.

Here's the final product...


...and one up close


Saturday, August 4, 2012

Blueberry Bush Net

This was a quick little project but worth mentioning.  I wanted to protect our blueberry bushes from birds so we could get some for ourselves.  And it was worth it.  Look at the first round of blueberries I picked!  We've been getting a bowl this full every week!


I did some research online for ideas to get me started.  A lot of people build a frame out of wood or PVC pipe, but in the end I decided I didn't want to make a fixed structure.  For one thing, I wanted it to break down afterward because we don't have a good place to store a big frame.  Additionally, I wanted a more natural, low profile look that would blend into the background.


MATERIALS:


6' bamboo stakes

"BirdBlock" netting from Gardener's Supply Company online.
(They also sell this at The Home Depot for cheaper)


green gardening velcro tape

landscaping staples

TOOLS:


PROCEDURE:


I first used the loppers to clip the bamboo stakes to the right height and pushed them into the ground at the four corners of the bushes (I made the back two a little shorter than the front two because the ground is higher at the back of the bushes and it was difficult to get them deeper in the ground without breaking them).  


Then I measured and cut the piece of bird net to the right size and draped it over the bushes and bamboo stakes.  Sounds easy, but this was the hardest part of the project.  The netting was getting so stuck to every little branch, it was slow-going to get it on there just as I wanted it.  It may have helped to have another person lift the other side of the net so we could go up and over without touching the branches and then let it down over the bush.


Next I used a few little pieces of the green gardening velcro tape at the top of each bamboo stake to secure the netting to them.


velcro at the top of each stake


I wanted to have easy access for getting in to pick the blueberries as they ripened, so I cut a slit down the netting just around the corner on one end of the enclosure and used another piece of the velcro tape to secure my makeshift 'door' shut.

slit on the end for the 'door', secured with velcro

The last step was securing the netting to the ground so that critters wouldn't be able to enter from underneath.  I inserted the landscaping staples through the holes in the net and into the ground several inches apart around the perimeter of the enclosure.


landscaping staples along the bottom


Note: In order to get into the enclosure to harvest the blueberries, I remove the landscaping staples from the ground along the front of the enclosure, remove the little piece of velcro that secures my 'door' shut, and pull the netting up to drape it over the top while I pick.

opening the 'door' on the front


Thursday, April 19, 2012

Xylophone Stands

Here's a peek at my latest project.  I've constructed the prototype, and the entire project means constructing an additional eight.

The Prototype
These will be stands for the xylophones and bells in my classroom.  Right now the instruments are sitting on a rarely-cleaned patch of floor in the classroom.  The kids have to sit on said patch of floor to play them.  The benefits of the stands will be twofold.  First, the kids will be able to stand, a preferable playing position.  Second, I hope that putting wheels on the stands will instruments more mobile, therefore making it easier to push them aside to clean the floor.

Prefabricated xylophone stands start at around $175:
An Example of the Prefab Version

I aim to create 9 of my own stands for a total of roughly $200.

This has been my most challenging project to date, as my grandfather is no longer here to be my teacher and guide.  I have been sorely missing his knowledge, his problem-solving skills, and his companionship during this project.  We all agree that Grandpa is irreplaceable, and that none of us will ever know all that he knew.  We are reminded daily of his absence, in situations where we would have gone to him for help, and in the gizmos and contraptions that he left behind at which we now marvel.

Before he passed away, he had drawn up sketches of the three different sized stands and given me a materials list to take to Home Depot.  I have discovered now that a lot of the plan was in his head and not in the drawings.  It has been quite a challenge trying to deduce his plan from what he left me.

My father has been incredibly helpful during this project, and for that I am very grateful.  He went with me to Home Depot, manned the saws for the cutting-out-the-plywood-pieces phase, and has shown me how to use many of the tools and doohickeys found in grandpa's workshop.

Despite the void that I'm feeling without Grandpa here, I have found a great deal of enjoyment in each success along the way.  Each time I make a realization about his intentions for the project or figure out something on my own that I can only assume he would have taught me, I feel a sense of excitement.

Cutting out the pieces:


Doweling:


Clamp to Dry Glue:


Casters:

Wednesday, February 1, 2012

Tubano Drum Sound Comparison

i wanted to comment on the sound quality of my homemade tubanos and compare them to the Remo brand pretuned tubano after which they were modeled.  the short answer...Remo brand tunable tubanos take first place, with the non-tunable Remos in close second.  but my homemade drums are really pretty decent for what they are.  out of my first two attempts at homemade tubano drums, i was most pleased with the sound of the drum head made of ripstop nylon.

Remo brand pretuned tubano:
this was the drum after which my homemade tubanos were modeled.  the internal apparatus in the bottom of the tubanos is designed to create a low, resonating, focused tone in the center of the drum head, and a shallower, higher pitched tone on the outer edge of the drum head.  i love the rich, booming low tone of the Remo drums.  the higher tone on this particular drum is not very clear, but it may be due to years of use and stretching of the (non-tunable) head.  Remo's tunable tubanos are awesome, and if my school budget allowed, i would love a classroom full of them!


homemade tubano "uno":
the first tubano i constructed used standard nylon "packcloth" fabric for the head.  the low tone in the center of the drum head is a little bit muted, and nowhere near as resonant as the Remo tubano, but in my opinion it's really pretty decent for being homemade.  the pitch is lower than that of the Remo.  there's a good, clearer high tone on the edge of the drum head.
homemade tubano "uno"
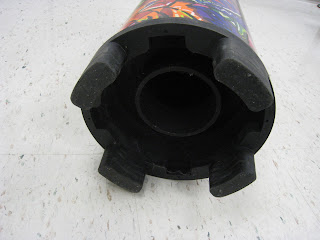
homemade tubano "uno" (bottom)
homemade tubano "dos":
i decided to try ripstop nylon for the second homemade tubano head.  ripstop nylon is made to be resistant to ripping, and it is designed such that if the fabric does tear, the tear will be contained and not grow larger.  i figured as long as the sound quality didn't suffer, it would make sense to use this fabric for my drums, which are to be used by elementary school aged children on a regular basis.  i was very pleasantly surprised at the resulting sound of the ripstop nylon.  again, it doesn't top the booming low tone of the Remo, but this drum really rings!  it is far more resonant than the muted tone of my first homemade drum.  the pitch is lower than the Remo, and one funny thing to note is i must speak at just the right pitch, because it actually sings when i talk near it :).  also in this drum's favor, there's still a discernible difference between the lower center tone and the outer edge high tone.

homemade tubano "dos"
homemade tubano "dos" (bottom)